
The Process...
Some days art turns out EXACTLY as we envision. Some days they don’t.
Some days art is rushed due to schedules or time constraints. Some days they are a process over many days, weeks, or months.

Back in 2016, Janice and I attended Art Is You in Santa Rosa, and Janice REALLY wanted to take the Finnabair class with Anna. So we signed up. In the pre-class worksheet, we were instructed to bring “things” to use for texture and dimension. It didn’t matter what color, as we would be using Heavy Gesso to create a single color base upon which we would then build up color.
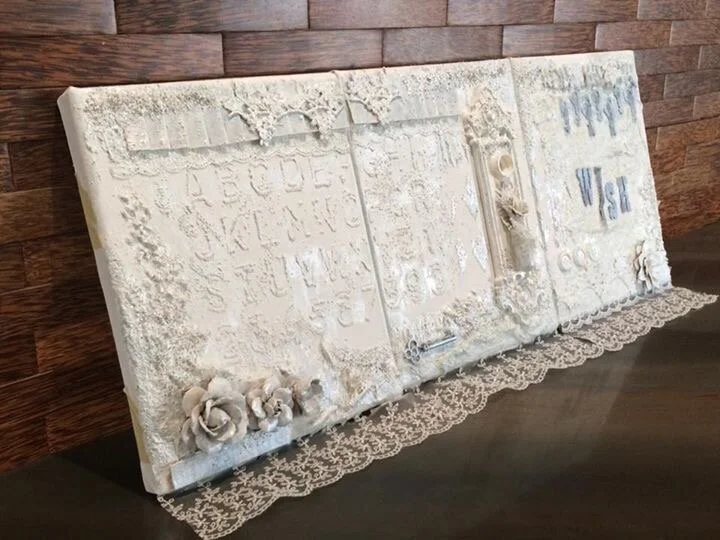
The class project utilized black gesso as the base, of course, me being me, bought white gesso. During the class, I created a triptych that focused on the word WISH. I enjoyed the process, but honestly, I am only about 60% satisfied with the outcome.
Fast forward to one cold day back in October 2018, my friend, Marie invited us over to her house for a casual play date using Finnabair products. So, I loaded up my goods and a vertical canvas to play with.
Well, I DID play, but the end result wasn’t anything like my style. I was thinking of it as something cute for my granddaughter’s bedroom… all cotton candy pink and lavender. Well, I wasn’t pleased with it, so for over a year, it was discarded to a dark corner at home.

Fast-forward to fall 2019. I decided to heavy white gesso the whole thing back to rectangle one.

Even just turning it all back to white was better. But, I still wasn’t happy with those experimental hot glue drips. So, I started by peeling the drips off and painting the entire piece as an ombre gradient. What could go wrong at this point, right? It’s only a canvas.

Well, then…. I decided the corrugated hearts and paper rosebuds & leaves just weren’t doing for me either. Man… why am I so picky about this canvas? How many times can it possibly change already? So, buh-bye hearts and flowers. But, then…. that left a BIG ugly spot. ‘What to do now? Does it really matter that much? I have SO many other things I could be doing right now.’
Enter paper… and that would have to be ripped and inked and get black paint dots from foam shelf lining and then some dry-brushing. Sheesh. It’s just a blob of paper on a canvas that has now morphed a hundred times! This poor canvas must be screaming “figure out what you are doing, already!”

Well, that looks better, but now what? Now there’s a BIG ‘ol piece of paper in focus and the top section has hot glue scars!
Maybe if I layer something more there, it will be good? But what??? There’s already so much going on. Hmmm. Enter, RMS CAST RESIN BLANKS!!! Testing. Testing. 123. Which one? Marie or Victoria?

My RMS Marie, keyhole escutcheon won.

But… now Marie (my resin casting, not my friend, Marie! lol) is just sitting there all white with a blank expression.
Enter, her new buddies…. Frozen Charlotte 45, Sock Doll PB, Sock Doll PA.


Well, Sock Doll PA ended up being invited as the guest of honor. But what to do about those ugly glue scars? How about some crackle paint? Yep! That works! Is it perfect? Of course not! But I like it.

Now for some scenic treatment on those resin castings. Starting with Marie, first some mustard-y yellow acrylic paint. Then, a wash of brown paint to get into all those wonderful nooks and crannies, topped off with some leafing sizing…. Then, onto the REAL copper leafing. Ok, so you CAN use imitation copper leafing, but I like to use the real deal because then I’m able to use chemical patina to get a lovely verdigris patina. This is after leafing, but before patina. Looks good, but just wait.

Next up is Sock Doll PA. She is simply, and I do mean simply, painted with Aged Jade acrylic paint. No special product paint here. Just the interior paint that is in my little camper, Little Miss Dimples. Nothing new to buy. It doesn’t get easier than that. You can also see the chemical patina effect.

Here she is with a dry-brushing of Modern Masters statuary bronze (semi-opaque) and a clear glaze.

BUT…. true to the course of this Play-In-Progress, I first tried to crackle finish her. Well, even though I like THAT result too, it wasn’t the look I wanted here. She looks like aged wood here. Kind of cool.

….and just for fun, here she is after I washed off some of the white crackle paint. She kind of has a vintage, chalk-ware look. Again, kind of cool. Experimenting is SO. MUCH. FUN. and like customers have told me, you can experiment with my RMS resin castings over and over again, and they just roll with the punches!

My next decision was whether to give her a crown or not. I ended up using a miniature-miniature version of my Ball Crown. These cuties will be available soon on the Marketplace, too! This one got a bit of surgery in order to fit inside the escutcheon. SO easy. Our resin cuts and sands like butter. NOT plastic-y at all.
It was treated to an alcohol ink bath - a mix of currant red and purple twilight to coordinate with the garnet colored accent beads.

All things considered, I am MUCH happier with the outcome. Now I just need a title. Thinking HOKEY-POKEY since I turned this one around so many times! lol


WISH. DREAM. CREATE. LAUGH. PLAY. CONNECT.
I hope you are having fun doing all of that today!
xoxo